9.9 KiB
| title | description |
|---|---|
| Getting Started with BMad Game Development | Build games with BMad's Game Development Module |
Build games faster using AI-powered workflows with specialized game development agents that guide you through preproduction, design, architecture, and implementation.
:::note[Module Extension] BMGD (BMad Game Development) is a module that extends BMad Method. You'll need BMad installed first—see the BMad v6 tutorial if you haven't installed it yet. :::
What You'll Learn
- Install and configure the BMGD module
- Understand game development phases and specialized agents
- Create a Game Brief and Game Design Document (GDD)
- Progress from concept to working game code
:::note[Prerequisites]
- BMad Method installed — Follow the main installation guide first
- A game idea — Even a rough concept is enough to start
- AI-powered IDE — Claude Code, Cursor, Windsurf, or similar :::
:::tip[Quick Path]
Install → npx bmad-method install (select BMGD module)
Preproduction → Game Designer creates Game Brief
Design → Game Designer creates GDD (and Narrative if story-driven)
Technical → Game Architect creates Architecture
Production → Game SM manages sprints, Game Dev implements
Always use fresh chats for each workflow to avoid context issues.
:::
Understanding BMGD
BMGD follows four game development phases with specialized agents for each:
| Phase | Name | What Happens |
|---|---|---|
| 1 | Preproduction | Capture game vision, create Game Brief (optional brainstorming) |
| 2 | Design | Detail mechanics, systems, narrative in GDD |
| 3 | Technical | Plan engine, architecture, technical decisions |
| 4 | Production | Build game in sprints, story by story |
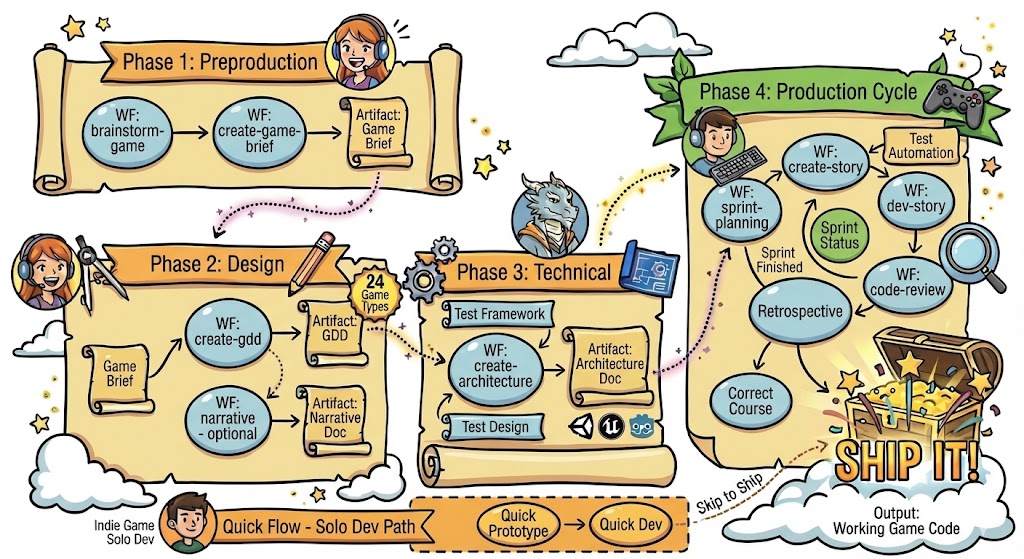
Complete visual flowchart showing all phases, workflows, and agents for game development.
Game Development Agents
| Agent | When to Use |
|---|---|
| Game Designer | Brainstorming, Game Brief, GDD, Narrative |
| Game Architect | Architecture, technical decisions |
| Game Developer | Implementation, code reviews |
| Game Scrum Master | Sprint planning, story management |
| Game QA | Test framework, test design, automation |
| Game Solo Dev | Quick prototyping, indie development |
Installation
If you haven't installed BMad yet:
npx bmad-method install
Or add BMGD to an existing installation:
npx bmad-method install --add-module bmgd
Verify your installation:
your-project/
├── _bmad/
│   ├── bmgd/           # Game development module
│   │   ├── agents/     # Game-specific agents
│   │   ├── workflows/  # Game-specific workflows
│   │   └── config.yaml # Module config
│   ├── bmm/            # Core method module
│   └── core/           # Core utilities
├── _bmad-output/       # Generated artifacts (created later)
└── .claude/            # IDE configuration (if using Claude Code)
Step 1: Create Your Game Brief (Preproduction)
Load the Game Designer agent in your IDE, wait for the menu, then start with your game concept.
Optional: Brainstorm First
If you have a vague idea and want help developing it:
Run brainstorm-game
The agent guides you through game-specific ideation techniques to refine your concept.
Create the Game Brief
Run create-game-brief
The Game Designer walks you through:
- Game concept — Core idea and unique selling points
- Design pillars — The 3-5 principles that guide all decisions
- Target market — Who plays this game?
- Fundamentals — Platform, genre, scope, team size
When complete, you'll have game-brief.md in your _bmad-output/ folder.
:::caution[Fresh Chats] Always start a fresh chat for each workflow. This prevents context limitations from causing issues. :::
Step 2: Design Your Game
With your Game Brief complete, detail your game's design.
Create the GDD
Start a fresh chat with the Game Designer agent.
Run create-gdd
The agent guides you through mechanics, systems, and game-type-specific sections. BMGD offers 24 game type templates that provide genre-specific structure.
When complete, you'll have gdd.md (or sharded into gdd/ for large documents).
:::note[Narrative Design (Optional)]
For story-driven games, start a fresh chat and run narrative to create a Narrative Design Document covering story, characters, world, and dialogue.
:::
:::tip[Check Your Status]
Unsure what's next? Load any agent and run workflow-status. It tells you the next recommended workflow.
:::
Step 3: Plan Your Architecture
Start a fresh chat with the Game Architect agent.
Run create-architecture
The architect guides you through:
- Engine selection — Unity, Unreal, Godot, custom, etc.
- System design — Core game systems and how they interact
- Technical patterns — Architecture patterns suited to your game
- Structure — Project organization and conventions
When complete, you'll have game-architecture.md.
Step 4: Build Your Game
Once planning is complete, move to production. Each workflow should run in a fresh chat.
Initialize Sprint Planning
Load the Game Scrum Master agent and run sprint-planning. This creates sprint-status.yaml to track all epics and stories.
The Build Cycle
For each story, repeat this cycle with fresh chats:
| Step | Agent | Workflow | Purpose |
|---|---|---|---|
| 1 | Game SM | create-story |
Create story file from epic |
| 2 | Game Dev | dev-story |
Implement the story |
| 3 | Game QA | automate |
Generate tests (optional) |
| 4 | Game Dev | code-review |
Quality validation (recommended) |
After completing all stories in an epic, load the Game SM and run retrospective.
Quick Prototyping Alternative
For rapid iteration or indie development, load the Game Solo Dev agent:
quick-prototype— Rapid prototypingquick-dev— Flexible development without full sprint structure
What You've Accomplished
You've learned the foundation of building games with BMad:
- Installed the BMGD module
- Created a Game Brief capturing your vision
- Detailed your design in a GDD
- Planned your technical architecture
- Understood the build cycle for implementation
Your project now has:
your-project/
├── _bmad/                         # BMad configuration
├── _bmad-output/
│   ├── game-brief.md              # Your game vision
│   ├── gdd.md                     # Game Design Document
│   ├── narrative-design.md        # Story design (if applicable)
│   ├── game-architecture.md       # Technical decisions
│   ├── epics/                     # Epic and story files
│   └── sprint-status.yaml         # Sprint tracking
└── ...
Quick Reference
| Command | Agent | Purpose |
|---|---|---|
*brainstorm-game |
Game Designer | Guided game ideation |
*create-game-brief |
Game Designer | Create Game Brief |
*create-gdd |
Game Designer | Create Game Design Document |
*narrative |
Game Designer | Create Narrative Design |
*create-architecture |
Game Architect | Create game architecture |
*sprint-planning |
Game SM | Initialize sprint tracking |
*create-story |
Game SM | Create a story file |
*dev-story |
Game Dev | Implement a story |
*code-review |
Game Dev | Review implemented code |
*workflow-status |
Any | Check progress and next steps |
Common Questions
Do I need to create all documents? At minimum, create a Game Brief and GDD. Architecture is highly recommended. Narrative Design is only needed for story-driven games.
Can I use the Game Solo Dev for everything? Yes, for smaller projects or rapid prototyping. For larger games, the specialized agents provide more thorough guidance.
What game types are supported? BMGD includes 24 game type templates (RPG, platformer, puzzle, strategy, etc.) that provide genre-specific GDD sections.
Can I change my design later?
Yes. Documents are living artifacts—return to update them as your vision evolves. The SM agent has correct-course for scope changes.
Getting Help
- During workflows — Agents guide you with questions and explanations
- Community — Discord (#bmad-method-help, #report-bugs-and-issues)
- Documentation — BMGD Workflow Reference
- Video tutorials — BMad Code YouTube
Key Takeaways
:::tip[Remember These]
- Always use fresh chats — Load agents in new chats for each workflow
- Game Brief first — It informs everything that follows
- Use game type templates — 24 templates provide genre-specific GDD structure
- Documents evolve — Return to update them as your vision grows
- Solo Dev for speed — Use Game Solo Dev for rapid prototyping :::
Ready to start? Load the Game Designer agent and run create-game-brief to capture your game vision.